Introduction
What is PyStack3D ?
PyStack3D is an open source library written in Python which provides tools to do images stacks corrections, typically before image segmentation for images issued from 3D FIB-SEM acquisition.
The pystack3d workflow can be applied to multiple channels (image stacks corresponding to multiple detectors) and consists in the following optional process steps that can be executed in any order:
croppingto reduce the image field of view to a ROI (Region Of Interest)background removalto reduce, based on polynomial approximations, contrast/brightness inhomogeneties resulting for instance from shadowing, charging, …intensity rescalingto homogenize the ‘gray’ intensity distribution between successive frames/slicesregistrationto correct the images misalignment due to shifting, drift, rotation, … during the images acquisitiondestripingto minimize artefacts like stripes, that can appear in some image acquisition technics (typically in FIB-SEM)resamplingto correct non uniform spatial steps between slicescropping_finalto eliminate artefacts produced near the edges during the image processing, or to select another ROI at the end.
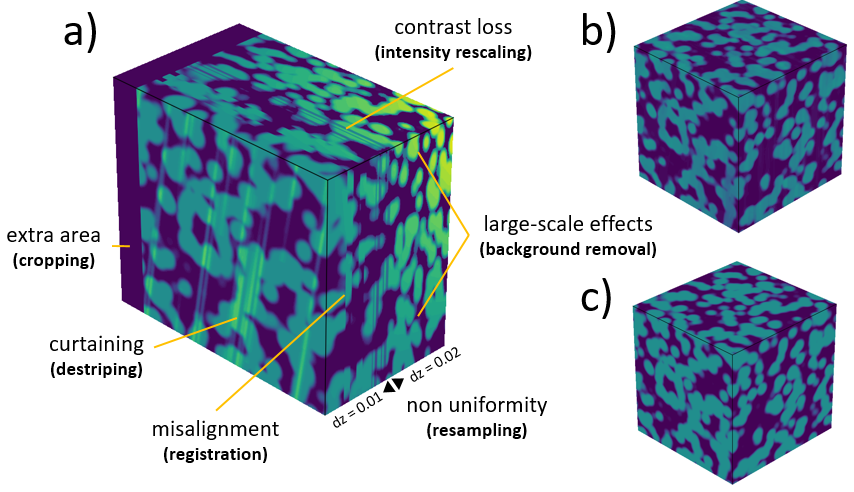
Synthetic case illustrating a) the defects to be removed, b) the corrected stack by PyStack3D, c) the ground truth.

Illustration of a FIB-SEM image correction using some of the PyStack3D process steps.
Performance
PyStack3D was designed to perform rapid stack corrections using multiprocessing.
Here is an example of processing times associated with the example provided here, corresponding to a stack of 2000 images, sized 4224 x 4224 before cropping and 2000 x 2000 after cropping, using 32 CPUs (Intel(R) Xeon(R) Platinum 8362 CPU @ 2.80GHz) on a Linux server.
Process |
Time (s) |
|---|---|
cropping |
30 |
bkg_removal |
40 |
destriping |
700* |
registration |
24 |
intensity_rescaling |
24 |
resampling |
11 |
(*) 120s with a GPU Nvidia A-100.
Install
pip install pystack3d
Note
Note that to be executed with GPU, the pyvsnr library used by the destriping process requires a specific installation. Refer to the pyvsnr requirements section for further details.
Tests and examples execution
For tests and examples execution, the full pystack3d project has to be installed via git:
git clone https://github.com/CEA-MetroCarac/pystack3d.git
cd [path_to_your_pystack3d_project]
Once the project has been cloned, the python environment has to be created and completed with the pytest package (for testing):
pip install .
pip install pytest
Then the tests and the examples can be executed as follows:
pytest
cd examples
python ex_synthetic_stack.py
python ex_real_stack.py
Acknowledgements
This work, carried out on the CEA - Platform for Nanocharacterisation (PFNC), was supported by the “Recherche Technologique de Base” program of the French National Research Agency (ANR).
Citations
In case you use the results of this code in an article, please cite:
Quéméré P., David T. (2024). PyStack3D: A Python package for fast image stack correction. Journal of Open Source Software. (submitted)
additional citations for the destriping:
Pavy K., Quéméré P. (2024). Pyvsnr 2.0.0. Zenodo. https://doi.org/10.5281/zenodo.10623640
Fehrenbach J., Weiss P., Lorenzo C. (2012). Variational algorithms to remove stationary noise: applications to microscopy imaging. IEEE Transactions on Image Processing 21.10 (2012): 4420-4430.
additional citation for the registration:
Thévenaz P., Ruttimann U.E., Unser M. (1998), A Pyramid Approach to Subpixel Registration Based on Intensity, IEEE Transactions on Image Processing, vol. 7, no. 1, pp. 27-41, January 1998